When you first dive into the world of truck bed camping, the gear catalog can be intimidating. Professional overlanding drawer systems and custom-fit bed platforms from premium brands are incredibly durable, but they often carry a price tag ranging from $1,500 to well over $3,000.
If you are just starting out, or if you prefer spending your hard-earned cash on gas and actual travel, there is a better way. Building a DIY truck bed sleeping platform is the ultimate rite of passage for any truck camper.
Not only does building it yourself save you a ton of money, but it also allows you to customize the setup perfectly to your specific needs, whether you drive a mid-size Toyota Tacoma or a full-size Ford F-150.
In this WildRigged guide, we will walk you through the fundamental steps to design, frame, and build a sturdy, budget-friendly sleeping platform with massive under-bed storage.
Why You Need a Raised Sleeping Platform
Throwing a sleeping pad directly onto the ribbed metal of your truck bed might work for one night, but it is a terrible long-term solution.
A raised platform provides two critical benefits:
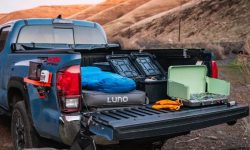
- Storage: The space underneath the plywood top becomes a massive “basement” for your gear, keeping your cooking equipment, recovery tools, and clothes organized and out of the way.
- Comfort and Insulation: Sleeping directly on the truck bed pulls heat away from your body. A wooden platform acts as an insulating barrier, and having a flat, carpeted surface makes your mattress infinitely more comfortable.
Step 1: Gather Your Materials and Tools
The beauty of this project is its simplicity. You do not need to be a master carpenter. You can source everything from your local Home Depot or Lowe’s for under $200.
The Materials:
- 3x 3/4-inch CDX Plywood sheets (for the top platform and drawer bases, if making them).
- 4-6x 2×6 or 2×8 dimensional pine boards (for the frame structure).
- 1 Box of 2.5-inch exterior wood screws.
- 1 Box of 1.5-inch wood screws.
- Indoor/Outdoor marine carpet or automotive speaker carpet.
- Spray adhesive (like 3M Super 77) and heavy-duty staples.
The Tools:
- Circular saw or jigsaw.
- Power drill/driver.
- Tape measure and a speed square.
- Staple gun.
Step 2: Measure Twice, Cut Once (The Wheel Well Dilemma)
The biggest obstacle in any truck bed build is the wheel wells. Your platform needs to clear them.
Measure the height of your wheel wells. If they are 9 inches tall, you must use a frame that is taller than 9 inches (this is why 2×10 or 2×8 boards are popular for full-size trucks, while 2×6 boards are common for mid-size trucks with shallower beds).
Next, measure the length of your bed with the tailgate closed, and the exact width from wall to wall. Pro Tip: Truck beds are rarely perfectly square. Measure the width at the cab, at the wheel wells, and at the tailgate.
Step 3: Build the Support Frame
The frame is the skeleton of your DIY truck bed sleeping platform. It needs to support the weight of two adults tossing and turning without sagging.
Most builds use a simple grid system. Run three long boards parallel to the sides of your truck (one on the left, one in the middle, one on the right). Then, measure and cut shorter boards to act as cross-braces, screwing them together to create a rigid structure.
Slide the frame into your truck bed to test the fit. It should sit flat and snug, but not so tight that it scratches the paint or gets stuck.
Step 4: Cut the Plywood Top
You cannot use one solid piece of plywood because it will be impossible to maneuver into a truck with a canopy or shell.
Instead, cut your 3/4-inch plywood into two or three manageable sections. Lay them over your wooden frame inside the truck. Use a pencil to trace the contours of the truck bed pillars and the tailgate corners, then pull them out and use a jigsaw to make the final precision cuts.
Many overlanders choose to put heavy-duty hinges on the side sections of the plywood near the wheel wells. This allows you to flip the “wings” up to access dead space for storing small items like jumper cables or extra water bottles.
Step 5: Carpet and Finish
Bare plywood will give you splinters and snag your sleeping bags. The final step is to wrap the top plywood pieces in durable, mold-resistant automotive or marine carpet.
Spray the top of your plywood with a generous coat of heavy-duty spray adhesive. Lay the carpet down flat, smoothing out any wrinkles. Then, flip the board over, pull the carpet tight around the edges, and secure it underneath with a staple gun every two inches.
Once carpeted, place the plywood sections back onto your frame. You can screw the main panels down into the 2×6 frame, leaving only your hinged doors free to open.
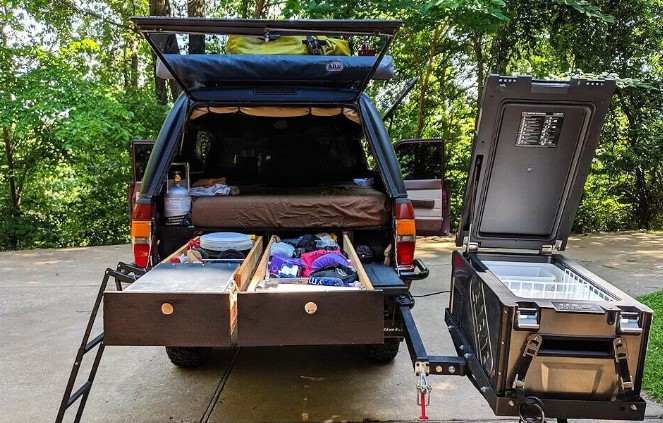
Step 6: The Storage Solution (Drawers vs. Bins)
Now you have a massive void underneath your bed. How do you use it?
- The Budget Method (Plastic Bins): The easiest and cheapest way is to buy long, low-profile plastic storage bins that slide perfectly between your frame supports. Simply pull them out onto your tailgate when you need your camp stove or clothes.
- The Advanced Method (Sliding Drawers): If you have extra plywood, you can build custom wooden drawer boxes. While you can buy expensive heavy-duty drawer slides, a classic dirt-bag hack is to rub paraffin wax on the bottom of the wooden drawers so they slide smoothly directly on the truck bed ridges.
Final Thoughts: Ready for the Wild
Building your own DIY truck bed sleeping platform is incredibly rewarding. For a fraction of the cost of a commercial system, you get a custom-tailored living space that turns your daily driver into a rugged, go-anywhere camper.
Once your platform is built, throw in a high-quality foam mattress, pack your storage bins, and point your rig toward the nearest dirt road. Your WildRigged adventure officially starts now.